What Are Audience Streams?
An Audience Stream is a curated package of sources — enriched with audience data, targeting, and pricing logic — ready for activation in campaigns. While a source is a raw deal from an SSP, a stream is the refined, buyer-ready version.
Sources can be considered as the raw ingredients, where streams are the recipes. You can combine multiple sources from different SSPs, add targeting to shape the audience, layer on data for precision, set pricing to reflect the value, and reuse the same stream across multiple campaigns.
Streams are what differentiate Bedrock from other buying platforms. Instead of rebuilding targeting and data overlays inside every line item, you build the stream once and reuse it. If you created a “Premium CTV Sports UK” stream last month, you can attach it to this month’s campaign without recreating it.
Canonical definition: An Audience Stream is a live, AI-orchestrated connection that matches verified audiences to the premium inventory where they flow — automatically optimized for reach, privacy, and human attention.
Location in the UI: Trading → Streams. The page header reads Audience Streams.
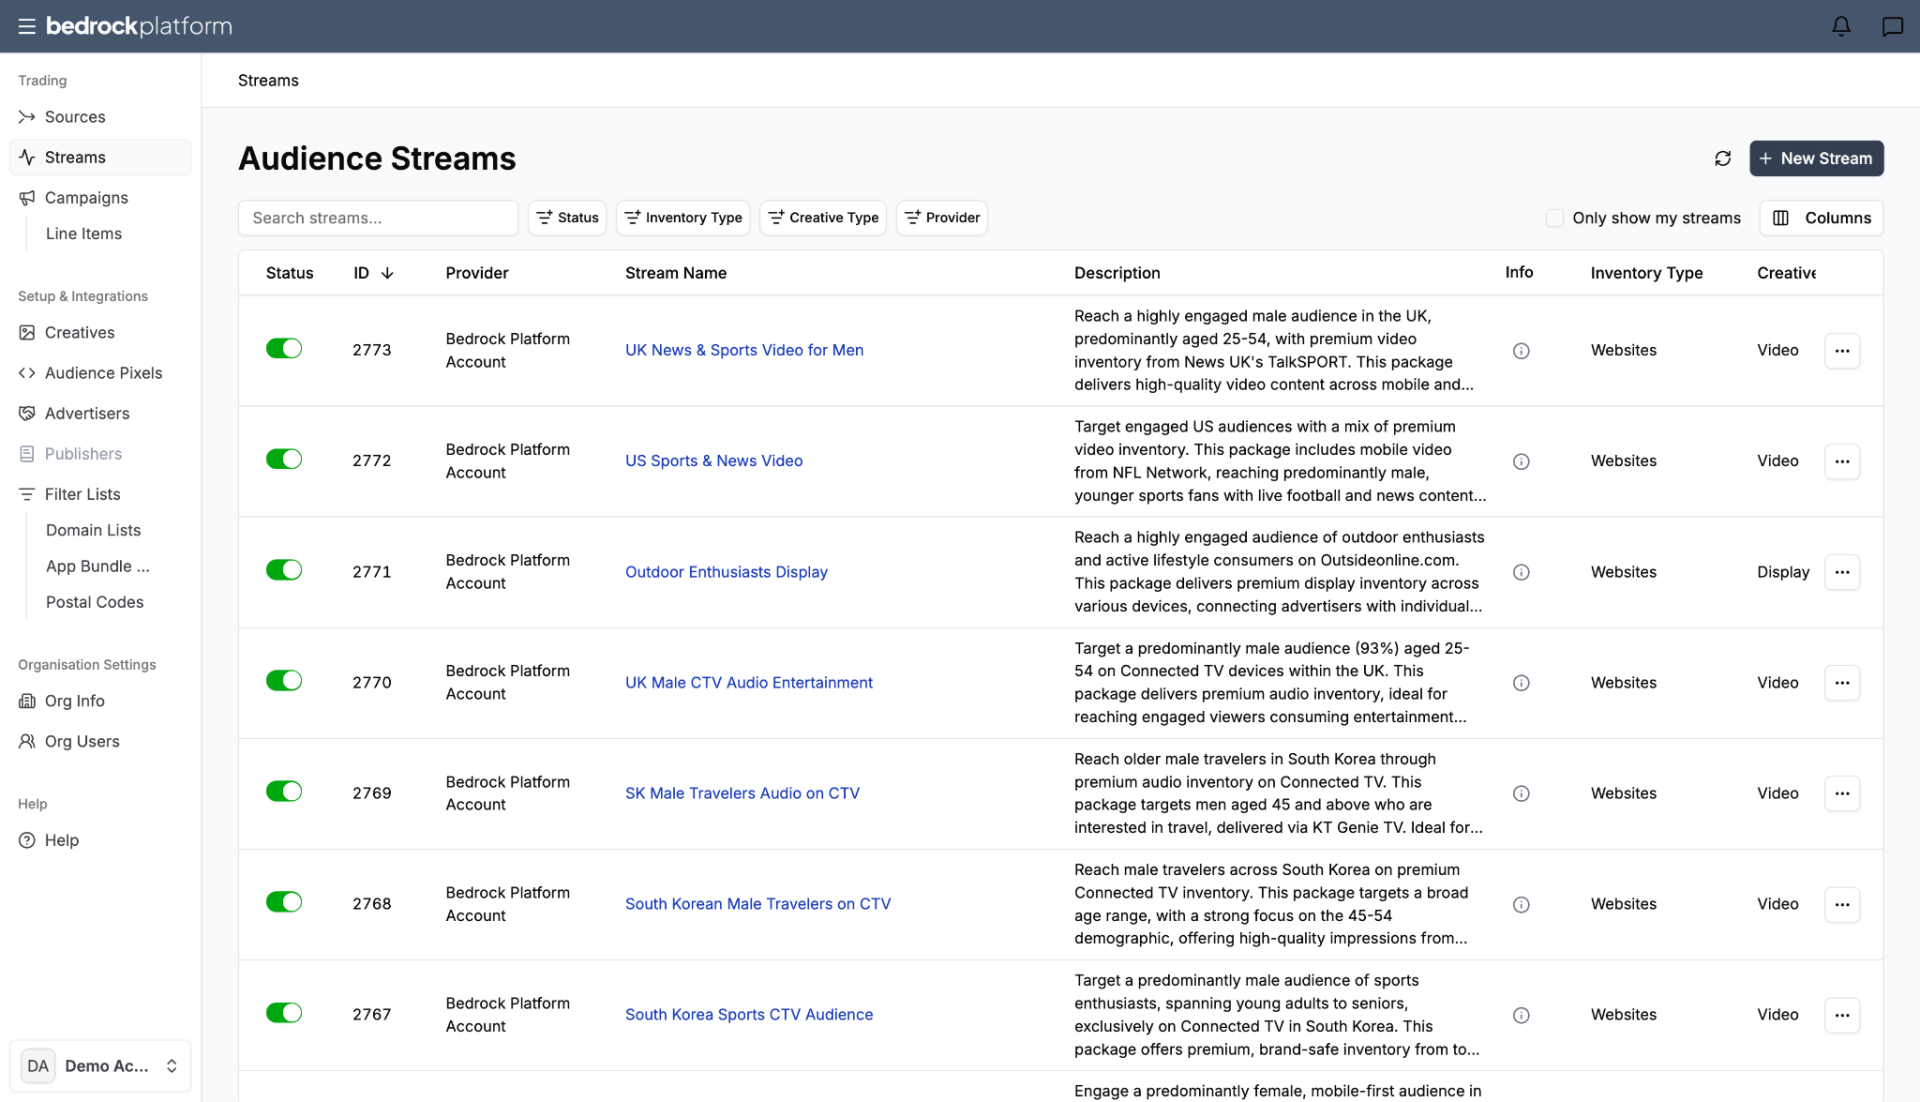
The Streams List
The Audience Streams list shows all streams in your account:
| Column | Description |
|---|---|
| Status | On/off toggle — pause a stream without deleting it |
| ID | Unique system identifier |
| Stream Name | The name you assigned |
| Sources | The sources included in this stream |
| Segments | Number of audience segments applied |
| Data Fees | Additional cost from data partners |
| Total Floor Price | The combined media + data floor price |
Click any stream to see its details: sources, targeting configuration, pricing breakdown, and which line items use it.
Creating a New Stream
Click New Stream to open the creation form. The page title reads New Audience Stream. Creation has four steps: Overview (name and sources), Audiences & Context, Targeting, and Distribution & Pricing.
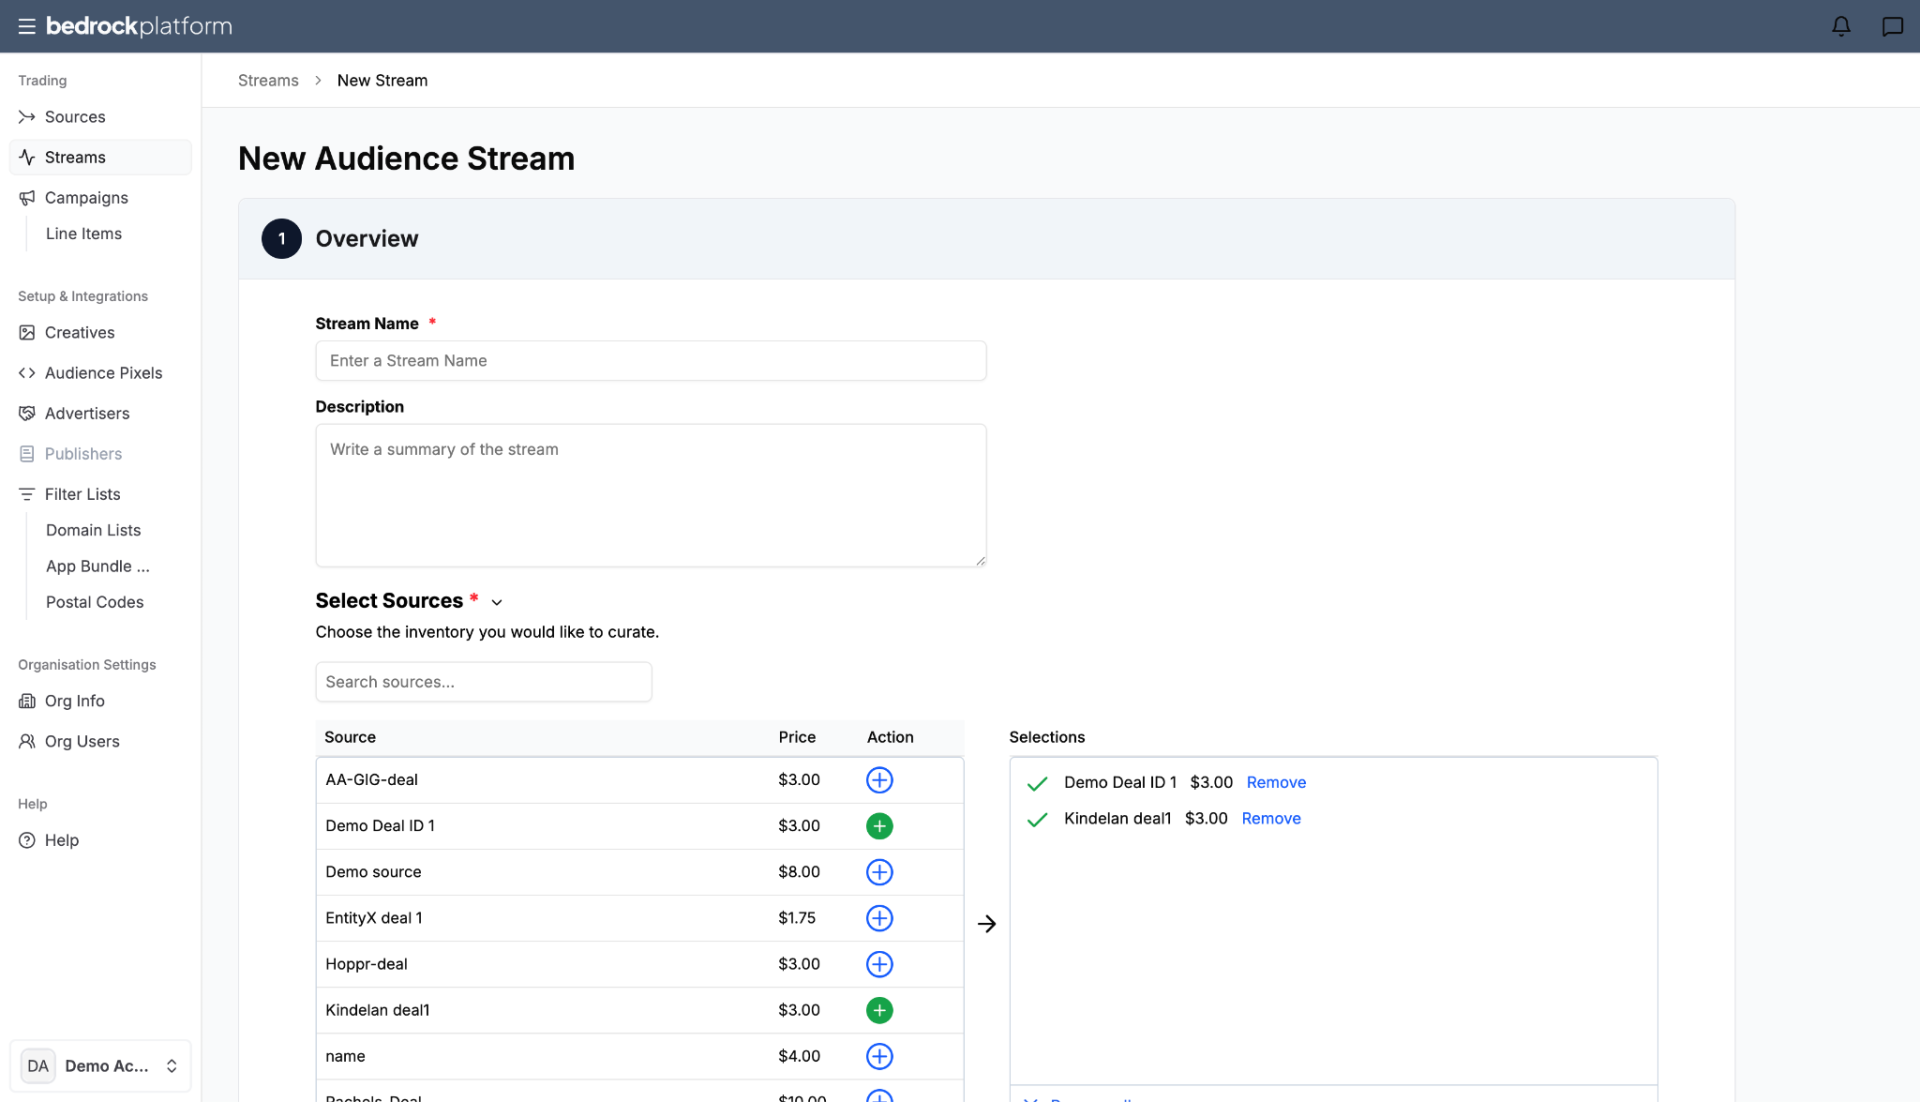
Step 1: Overview — Name and Sources
- Stream Name (required) — use a descriptive name that communicates what the stream delivers. Include dates, sources, and audience descriptors when possible. Example: PremiumCTV_Sports_US_Q4 or ANON_Display_FinanceAudience_UK. Streams accumulate fast; a good name saves time when searching later.
- Description (optional) — use if the name alone isn’t enough context.
- Select Sources — “Choose the inventory you would like to curate.” Search and add one or more sources. You can combine sources from different SSPs into a single stream. This is cross-vendor bundling — one of the core benefits of streams. Selected sources appear in the Selections panel on the right, showing name, price, and a Remove option.
Pricing rule: The stream’s base price automatically reflects the highest floor price among all sources in the stream. If you have a $1.00 source and a $2.72 source, the stream floor is $2.72 — because every bid must clear every deal’s minimum.
Step 2: Audiences & Context
“Find the right groups to see your ads and partner with other providers for maximum reach.”
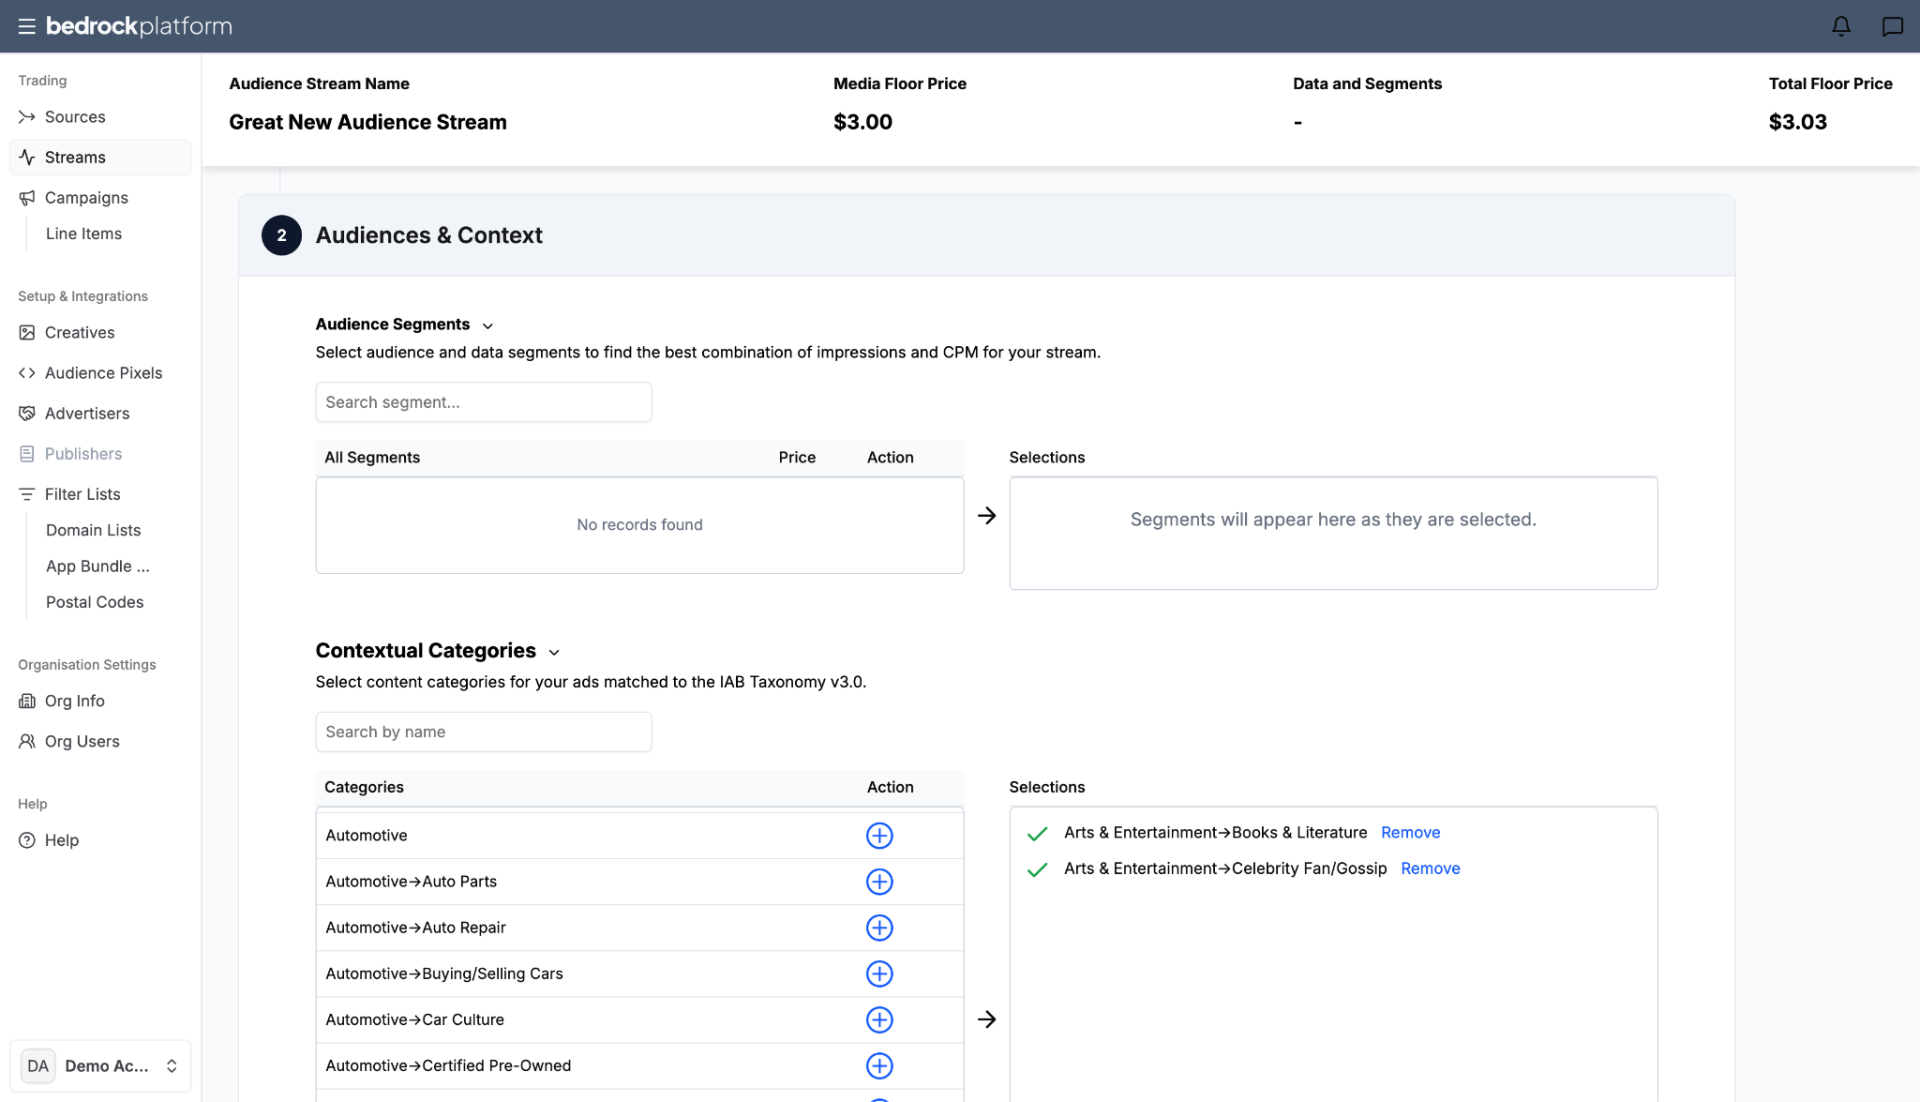
A sticky header bar appears at the top of the stream form showing the Audience Stream Name, Media Floor Price, Data and Segments cost, and Total Floor Price — so you can track pricing as you add layers.
All Segments:
- Third-party audiences — segments from data partners (Evorra, Anonymised — if configured on your account)
- First-party audiences — your own audience segments (if configured)
- Segments are shown in a table with Price and Action columns. Selected segments appear in the Selections panel.
Contextual Categories:
- “Select content categories for your ads matched to the IAB Taxonomy v3.0.”
- Browse or search categories (e.g., “Science+Physics”, “Shopping”, “Society+Dating”)
- Categories are derived from data in the bidstream
- Contextual targeting does not carry an additional cost
Attention Targeting (optional):
- “Target impressions by engagement level (powered by Lumen Research).”
- Adds a 1% fee to winning impressions
- Dropdown options include Off (no targeting) and engagement levels – High, Medium or Low
- Removing attention targeting reverts the price
Step 3: Targeting
“Specify exact parameters where needed for maximum effectiveness.”
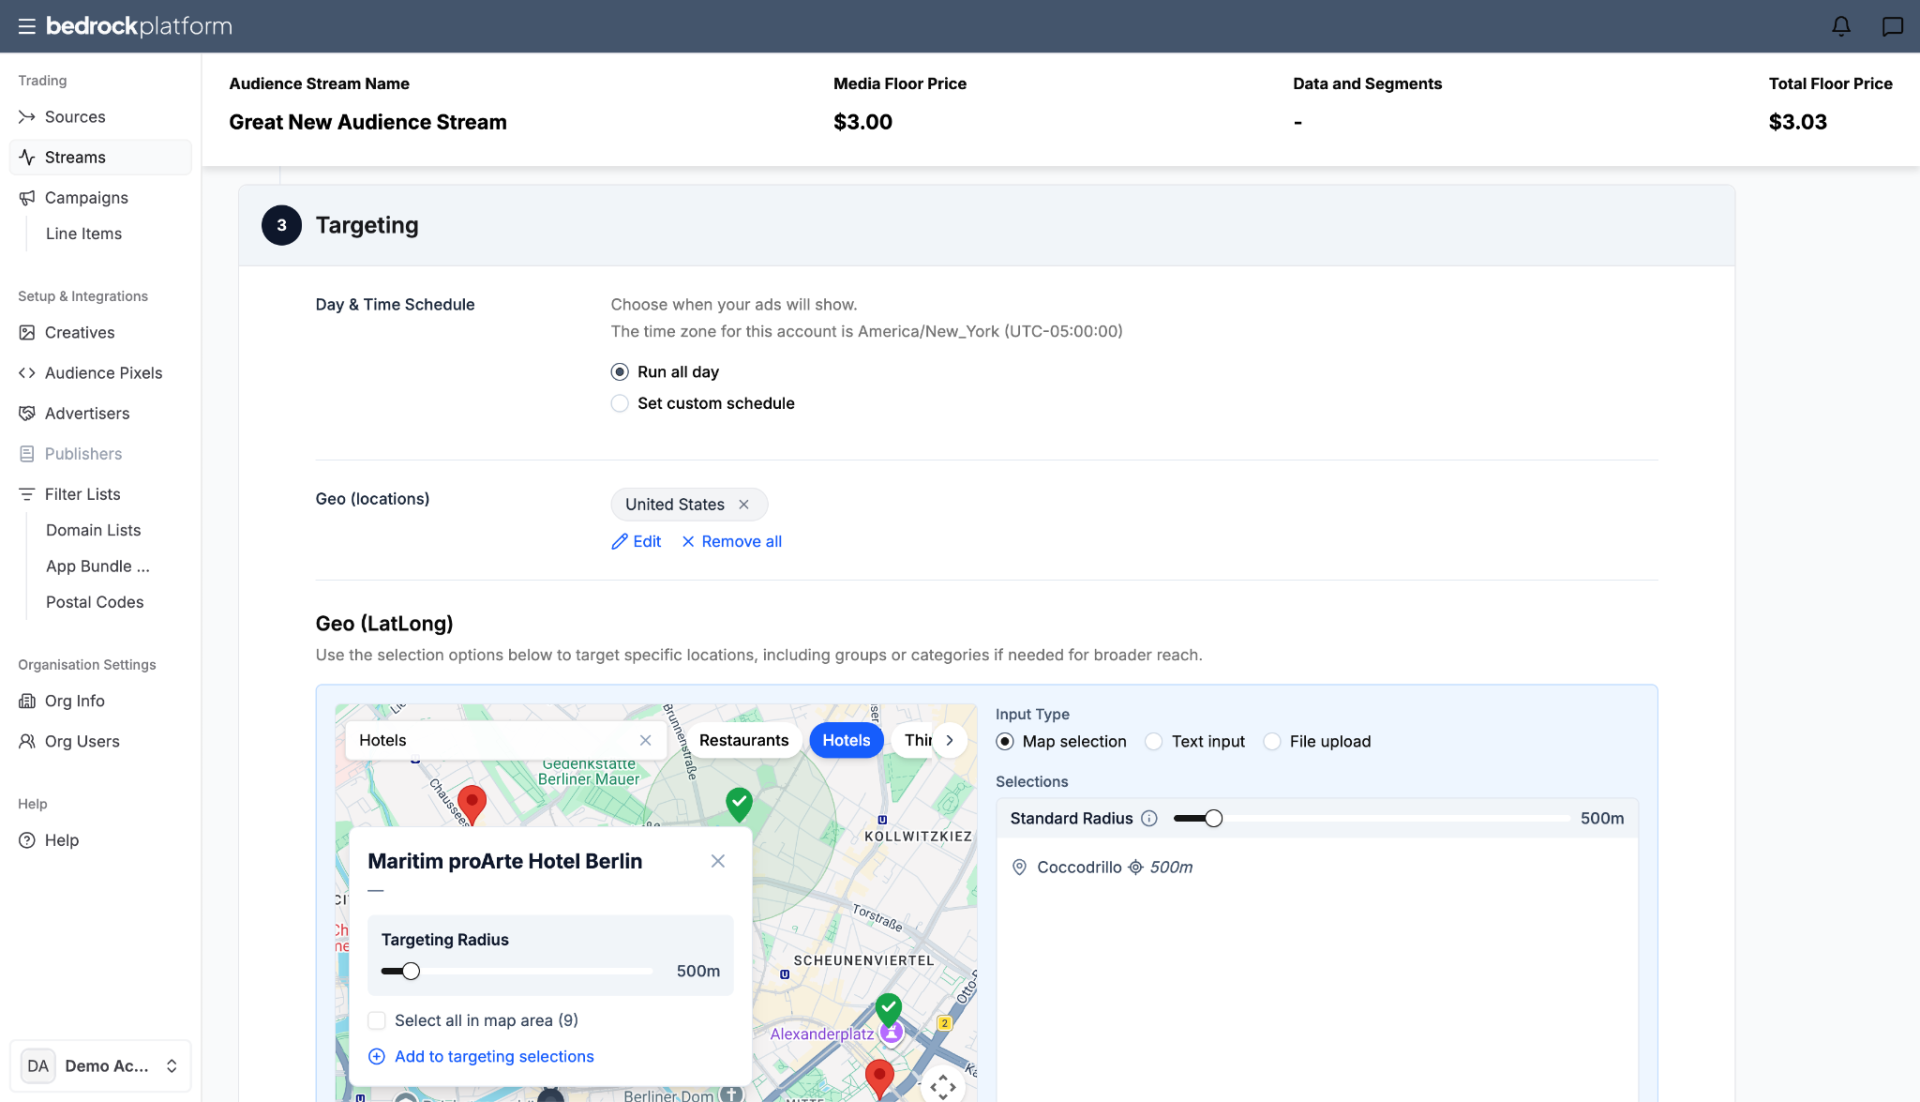
Day & Time Schedule:
- “Choose when your ads will show.” The time zone for the account is displayed (e.g., America/New_York UTC-05:00:00).
- Options: Run all day or Set custom schedule
- Custom schedule lets you select a day (e.g., Monday), set Start and End times, or check All Day
- Click Add Time Window To Target to add additional day/time rows
Geo (Locations):
- “Target by country, region or city.”
- Defaults may be set to your primary market (e.g., United States)
- Browse or search the country list to add locations. Selected countries appear in the Selections panel.
- Use Edit to modify selections, or Remove all to clear
- Geographic targeting does not incur extra fees
Geo (LatLong):
Allows geographic selection with a range of inputs, including categorization (e.g. hotel, restaurant, transit) and radius:
- Map selection – connected to the Google Maps API, browses, search and selection locations visually
- Text input – paste in Latitude, Longitude and Radius coordinates manually
- File upload – paste in Latitude, Longitude and Radius coordinates with a CSV or XLSX file
Postal Code Lists — target specific postal code areas (click + Add List)
Domain Lists — include or exclude specific websites (click + Add List)
App Bundle Lists — target specific apps (click + Add List)
Add targeting options… — a dropdown to add additional targeting parameters (e.g., browser, device type, device language, operating system)
Step 4: Distribution & Pricing
“Select buyers and get ready for trading.”
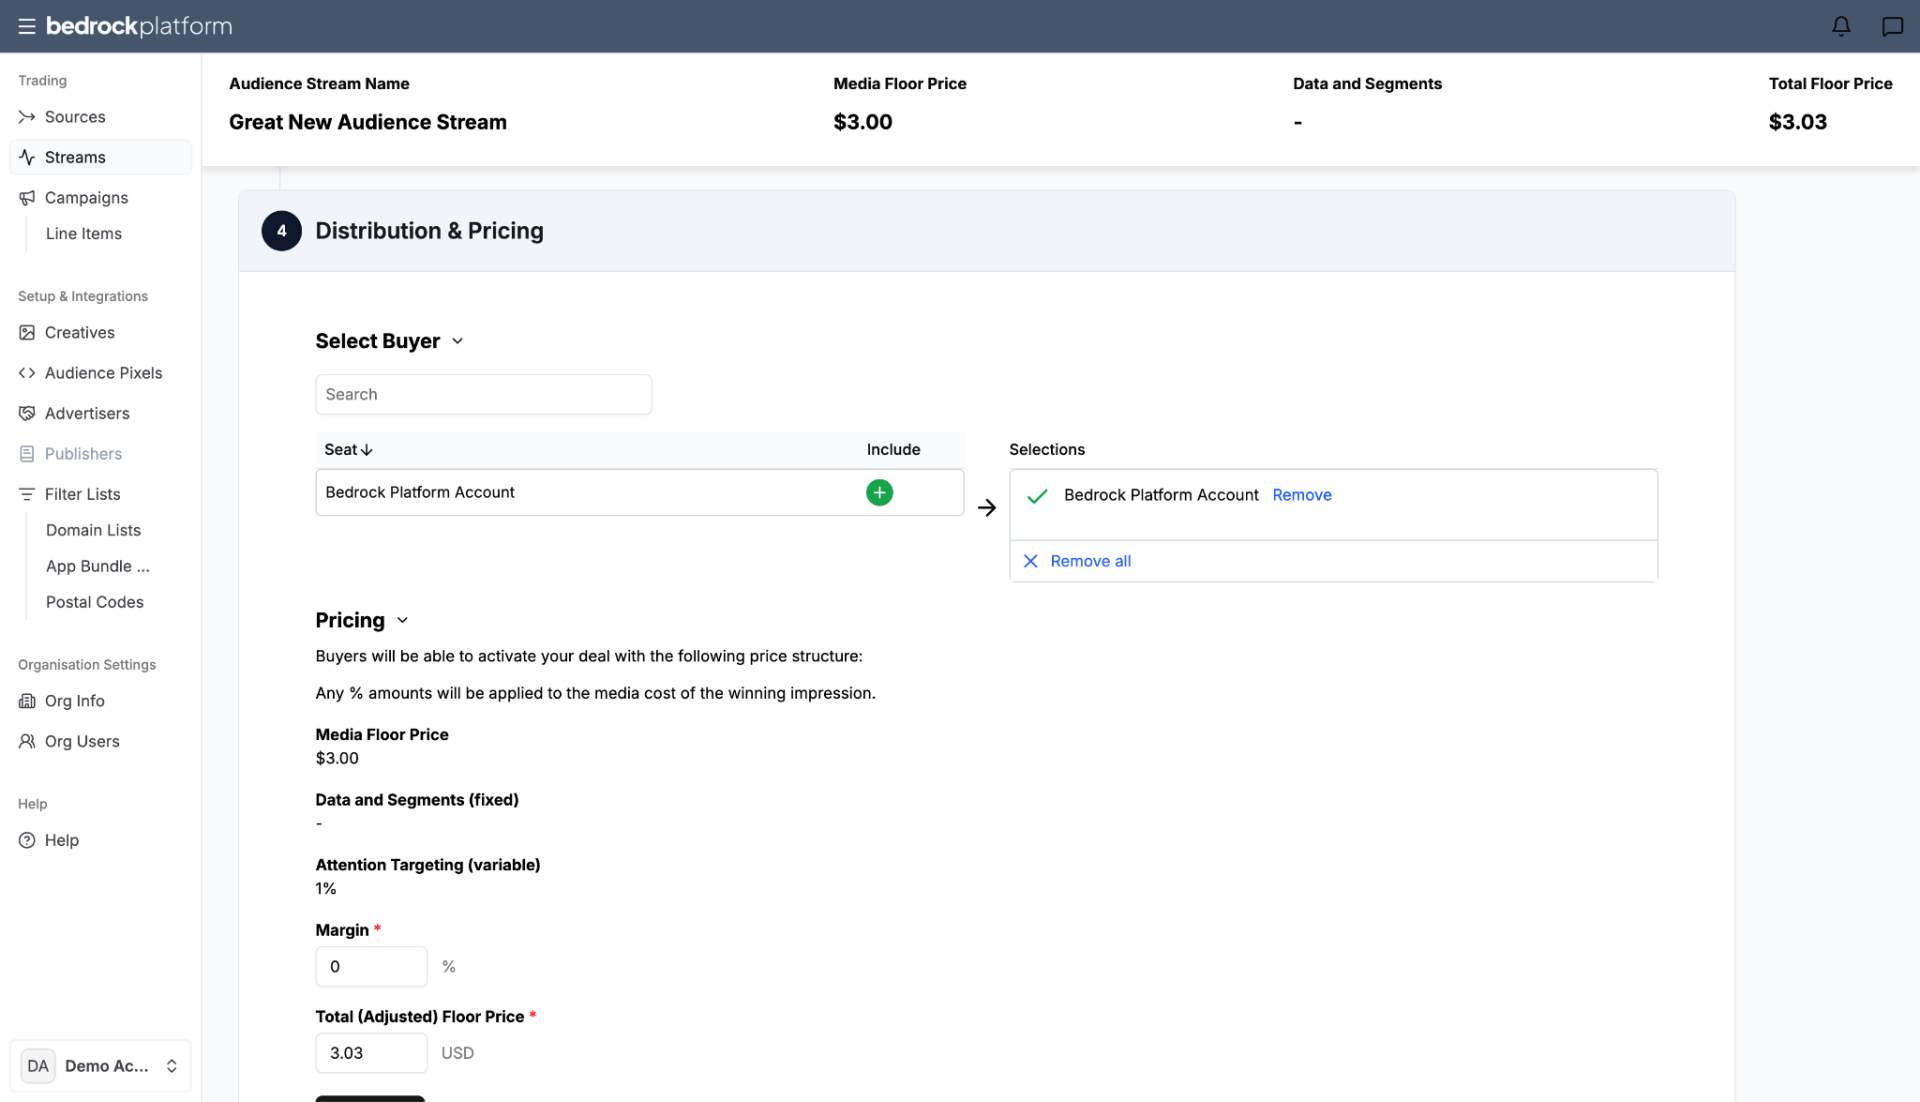
Select Buyer:
- Search and select the buyer seat(s) that will have access to this stream
- Selected buyers appear in the Selections panel with a Remove option
Pricing:
- “Buyers will be able to activate your deal with the following price structure:”
- Media Floor Price — the base floor from your sources (e.g., $8.00)
- Data and Segments (fixed) — additional cost from data partners
- Margin — optionally add a percentage margin on top. Example: a 25% margin on a $10 floor makes the stream price $12.50. The margin reflects the value you add by sourcing inventory and layering on data. If set to zero, the stream price equals the floor price.
- Total (Adjusted) Floor Price — the final price buyers pay, shown in USD
Click Next Step and then confirm to create the stream.
How Stream Pricing Works
The stream’s price builds from three layers:
| Layer | Source | Example |
|---|---|---|
| Media floor | Highest floor price among all sources in the stream | $8.00 |
| Data fees | Attention targeting (1% if enabled). Contextual targeting is free. | +$0.08 |
| Margin | Your optional markup (percentage) | +25% = $2.02 |
| Total | What the buyer pays per impression | $10.10 |
Why Streams Matter
Reusability
Build once, use many times. A stream can be attached to multiple line items across different campaigns. Change the campaign dates and budget — the stream stays the same.
Separation of Targeting from Campaign Logic
In most DSPs, targeting lives inside the line item. In Bedrock, most targeting lives in the stream — geographic, contextual, audience, device. The line item handles dates, budget, frequency capping, and bidding. This separation means you can reuse targeting configurations without rebuilding them every time.
Cross-Vendor Curation
A single stream can combine deals from Google Marketplace, Google Curated, and BidSwitch under one audience-focused label. The buyer doesn’t need to think about SSP boundaries — the stream abstracts them away.
Signal Enrichment
Streams are where you add the intelligence layer: identity data (Evorra), reach enhancement (Anonymised), and attention verification (Lumen). These signals make the stream more than the sum of its sources.
What’s Next?
After creating a stream, you’ll activate it in a Campaign by attaching it to a line item. See Campaigns.